Looking for our open source frameworks?

Implementing Custom Columns Layout in OmniFocus for Mac

by Curt Clifton on December 10, 2015

By William Van Hecke and Curt Clifton

In our previous post we discussed the design of Custom Columns layout for OmniFocus for Mac. In particular, we wanted to add this feature while keeping the improved approachability that is a hallmark of OmniFocus 2.

In this post, we’ll discuss how we implemented this design in our existing app.

Implementation

OmniFocus 2 uses view-based table views and Auto Layout for its sidebar and main outlines. In adding Custom Columns layout we had several problems to solve.

  • What class should be responsible for determining the current layout? Recall that the current layout is a function of the user’s app-wide default settings, whether they have upgraded to Pro, the current perspective, and whether that perspective has layout customizations.
  • If we’re using Custom Columns layout, which columns should be shown?
  • How wide should each column be given the current window width?
  • How do we position the fields for each column?
  • How do we decide when to elide columns because the window is too narrow or the hierarchy indentation is too deep?

Choosing the Current Layout

Here’s a diagram showing the structure of controllers and views in an OmniFocus window before we added Custom Columns layout.

Class diagram of OmniFocus Fluid layout

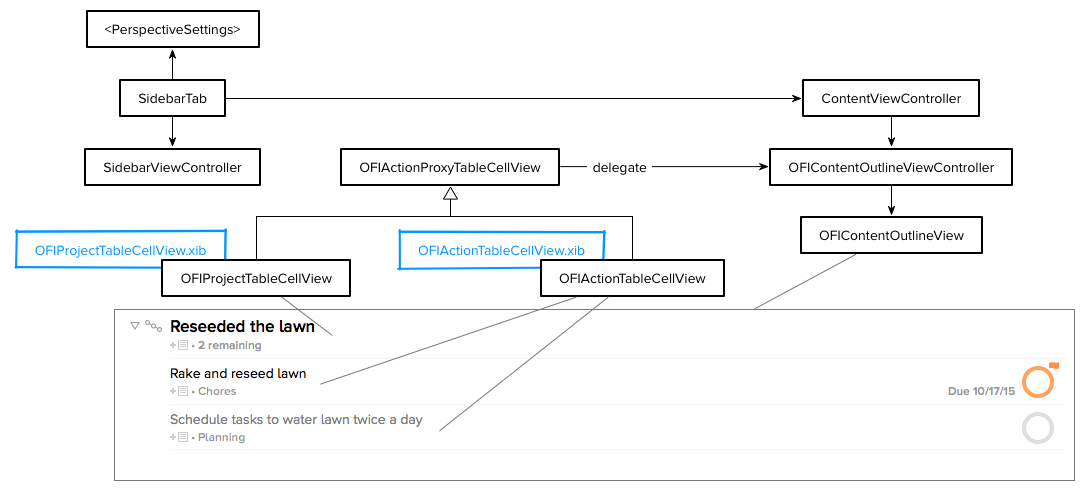
When switching tabs, the selected sidebar tab extracts the layout mode and other settings from the tab’s perspective. It then uses our window state restoration machinery to pass these settings down to the ContentViewController. The ContentViewController forwards the layout settings to the OFIContentOutlineViewController.

The outline view controller considers this per-perspective layout setting, the current Pro upgrade or trial status, and the value of the app-wide layout preference to determine the current layout mode. For each row in the main outline, the outline view controller uses the corresponding model object along with the current layout mode to vend the correct table cell view.

Sharing Code for Table Cell Views

For Custom Columns layout we needed to use different table cell views, but wanted to retain as much of the existing, working code as possible. As the figure above shows, both OFIProjectTableCellView and OFIActionTableCellView are backed by .xib files and have a common superclass, OFIActionProxyTableCellView. We wanted to add two more leaf nodes and .xibs for Custom Columns layout: OFIProjectColumnarTableCellView and OFIActionColumnarTableCellView. These classes needed to share some behavior with each other, but also needed to share some behavior with their corresponding Fluid variant. For example, both OFIActionTableCellView and OFIActionColumnarTableCellView needed to manage their status circles. This is a classic example of the diamond inheritance problem.

Since Objective-C (and Swift) don’t have multiple inheritance, we chose to solve this diamond inheritance by introducing assistant classes for the action and project table cell views. Here’s a diagram showing that design.

Class diagram showing code sharing between Fluid and Custom Columns layout

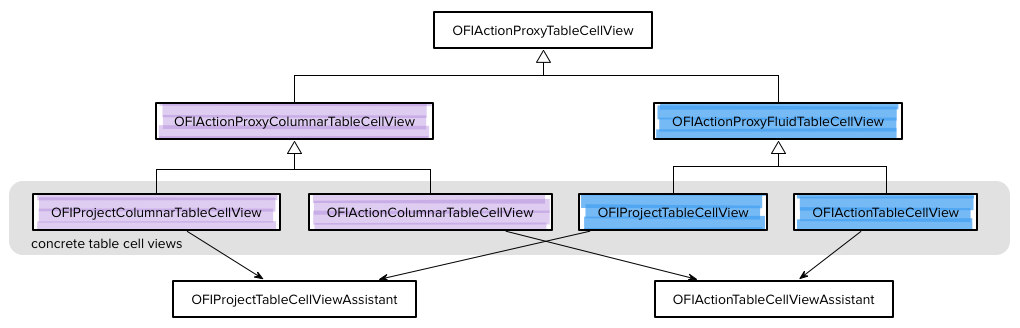
Shared code for the Custom Columns table cell views lives in OFIActionProxyColumnarTableCellView as shown on the left side of the diagram. The existing shared code for regular table cell views moved to OFIActionProxyFluidTableCell, shown on the right side of the diagram. The shared code across all these table cell views, primarily for managing notes, lives in OFIActionProxyTableCellView at the top of the diagram. Finally, the two assistant classes, shown at the bottom of the diagram, do the chores that are shared by all project rows (like displaying action counts) and by all action rows (like updating status circles). This design works well. The concrete table cell views have very little code. That code is primarily devoted to forwarding messages to the appropriate assistant. The .xib for each concrete table cell view handles instantiating the assistant at the same time the table cell view itself is instantiated.

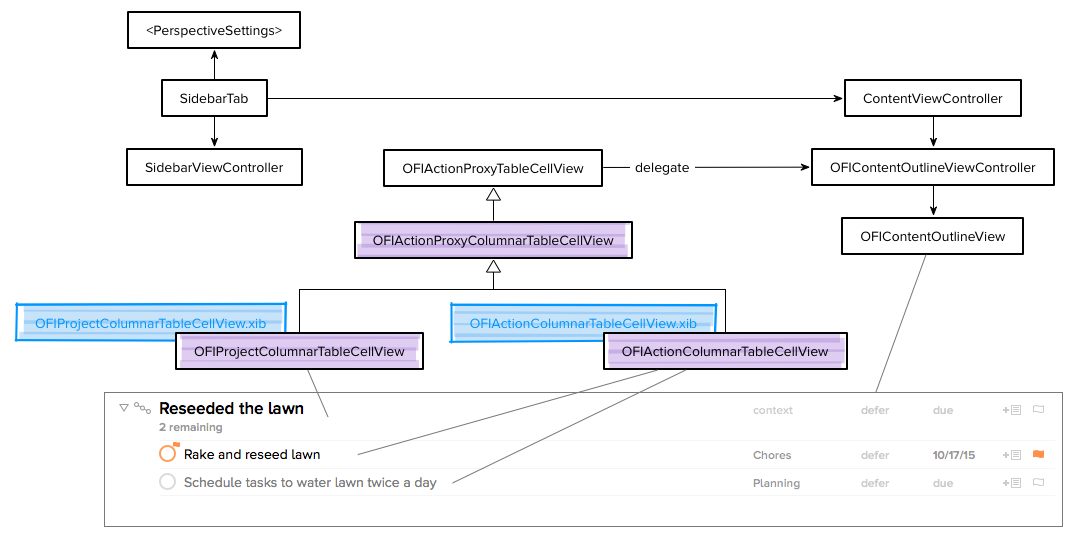
With this code sharing problem solved, the basic structure when using Custom Columns layout is shown in the diagram below. The highlights show the changes from the original Fluid layout.

Class diagram of OmniFocus Custom Columns layout

Sharing Column Info with Table Cell views

Once we had the correct table cell views for Custom Columns layout, the next challenge was letting cells know which columns should be visible. Recall that the OFIContentOutlineViewController knows about the current layout settings. Conveniently, our table cell views already had a delegate pointer to the outline view controller. The outline view controller implemented an OFITableCellViewDelegate protocol. To get column information, we add a new method to this protocol:

- (OFIColumnLayoutManager *)columnLayoutManagerForCellView:(OFITableCellView *)cellView;

Our table cell views call this delegate method. The outline view controller, as the delegate, decides which columns should be visible and instantiates an OFIColumnLayoutManager. This column layout manager is immutable and exposes all the information about columns necessary for the table cell view to decide which columns to show and where to position them. Here’s what the header looks like:

/// Instances of this class are immutable. We rely on that fact to do identity comparisons.
@interface OFIColumnLayoutManager : NSObject

- (instancetype)init NS_UNAVAILABLE;
- (instancetype)initWithColumnSpecifications:(NSArray <OFIColumnSpecification *> *)columnSpecifications NS_DESIGNATED_INITIALIZER;

// Width management
@property (nonatomic, readonly) CGFloat minimumTitleWidth;
@property (nonatomic, readonly) CGFloat maximumTitleWidth;
@property (nonatomic, readonly) CGFloat minimumMetadataColumnsWidth;
@property (nonatomic, readonly) CGFloat maximumMetadataColumnsWidth;
@property (nonatomic, readonly) BOOL areAllMetadataColumnsFixedWidth;
@property (nonatomic, readonly) NSArray <NSNumber *> *minimumColumnWidths;

/// Returns an array of NSNumbers, the CGFloat of which gives the column width.
- (NSArray *)columnsWidthsForTotalWidth:(CGFloat)totalWidth;

/// Calculates the multiplier and constant for a constraint relating the width of the title text field to the width of all the other columns combined.
/// - Parameter outMultiplier: must be non-NULL
/// - Parameter outConstant: must be non-NULL
/// - Returns: whether the out parameters were set
- (BOOL)titleWidthToOtherColumnsWidthConstraintMultiplier:(CGFloat *)outMultiplier constant:(CGFloat *)outConstant;

// Metadata column metadata
@property (nonatomic, readonly) NSInteger numberOfColumns;
@property (nonatomic, readonly) NSArray <NSNumber *> *columnKinds;

@end

We instantiate a column layout manager with an array of OFIColumnSpecification instances. These encapsulate the column kind and its minimum and maximum width.

Now we have enough information in the table cell view to layout out the columns. How should we do that?

Calculating Column Widths

Recall our goals:

  • Automatically choose the width for each column.
  • Resize variable-width columns proportionally with the width of the window.
  • Make indented child actions steal space from the title column until they reach a minimum width.
  • Beyond that, omit columns from left to right so that the existing columns remain aligned.

The graph below, which lived on Curt’s whiteboard for the summer, relates our desired column width to the table cell view width.

Graph relating column widths to table cell width

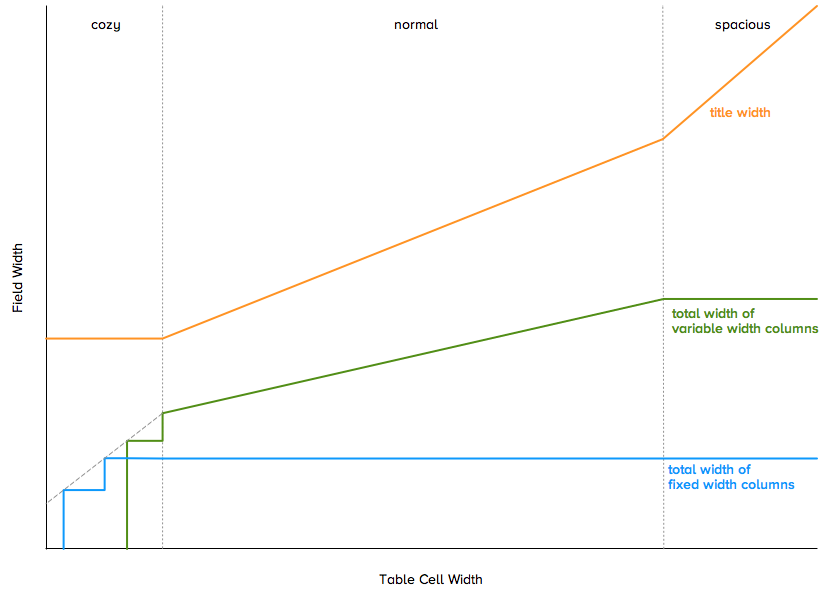
The graph shows three regions. Let’s consider these right to left, as we’d pass through them if you were making your OmniFocus window narrower. Here’s an example row laid out for the various regions.

Examples of Custom Columns layout at various widths

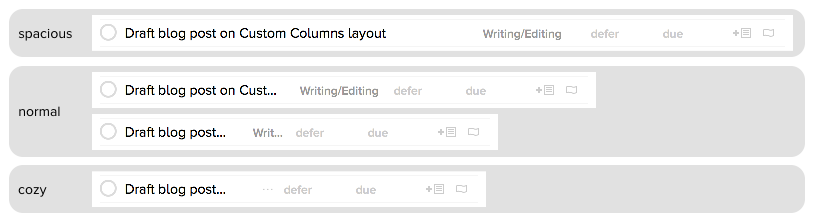
At the window’s widest, we’re in the spacious region on the right. When a table cell view is wide enough to be in this region, resizing the window directly resizes the title column. All the variable-width columns are at their maximum widths. And, of course, all the fixed-width columns are at their fixed widths.

As we make the window narrower, we enter into the normal region in the middle. Here all the fixed-width columns remain at their fixed widths and we allocate the remaining width proportionally between the item titles and the variable-width columns.

As we make the window narrower still, we enter the cozy region on the left. (We can also get cozy table cell views when you indent tasks inside action groups.) In this region all the columns have reached their minimum widths, so we have no choice but to drop columns. The stair steps in the graph represent the columns being removed.

Our existing table cell views all use Auto Layout. It’s an important part of our mechanism for handling variable-height rows that wrap the title text. We don’t want to lose that capability. On the other hand, in the cozy region, our column widths are non-linear; there’s a stepping down of widths as we elide columns. Auto Layout doesn’t handle non-linearity.

Cocoa’s solution for these cases is NSStackView, which allows you to set priorities on subviews and have them automatically removed as needed. NSStackView is great for many use cases. Unfortunately, we’ve found that it doesn’t yet perform adequately when used in table cell views, many dozens of which can be laying out at once (for example, while you resize a window).

We solved this problem by using a mix of Auto Layout and manual layout.

Mixing Auto Layout and Manual Layout

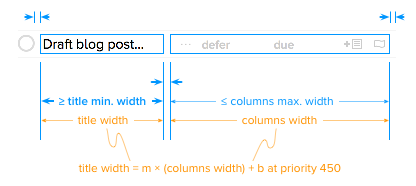
Our strategy is to use Auto Layout at the top level inside the table cell views, but to put all the column subviews inside a single OFIMetadataColumnsView that manually positions the columns. The title view and columns view are positioned and sized using Auto Layout. This figure shows the horizontal constraints that we use to do that.

Autolayout constraint system for title and columns views

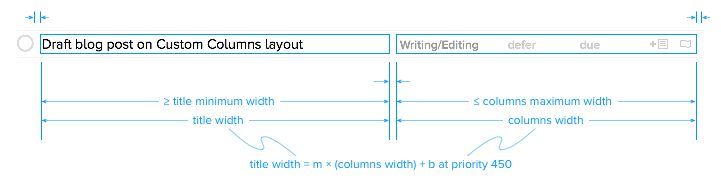
Going from the top of the figure down, we have fixed constraints setting the left edge of the title view, the right edge of the columns view, and the space between them. Next we have a constraint that sets the minimum width of the title field, followed by one that sets the maximum width of the columns. Finally, we have a low priority constraint relating the width of the title view to the width of the columns view. The priority on this ratio constraint is less than the OS-provided window resizing priorities. So, the window can be resized in a way that breaks this ratio constraint. This priority scheme allows different constraints to be active at different table cell widths.

In the spacious region, the maximum width constraint on the metadata columns view is active. The low priority ratio constraint is violated, which is why it’s low priority. Autolayout allocates all extra width to the title view as shown below.

Active Auto Layout constraints in the spacious region

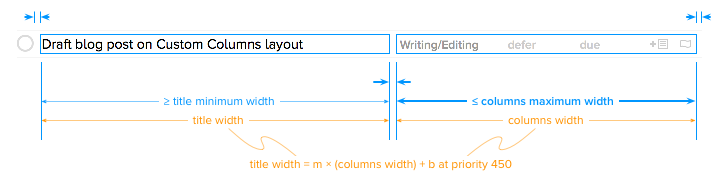
In the normal region, as shown below, the constraint that relates title view width to column view width is active.

Active autolayout constraints in the normal region

The constants for this ratio constraint are calculated based on the minimum and maximum widths of all the columns using a bit of algebra.

(For the curious:

max. title width = m * (max. variable width columns width + fixed columns width) + b

and

min. title width = m * (min. variable width columns width + fixed columns width) + b

Solve for m and b, then plug in the current values for all the other terms from the column layout manager. For child actions, we then adjust b to account for indentation.)

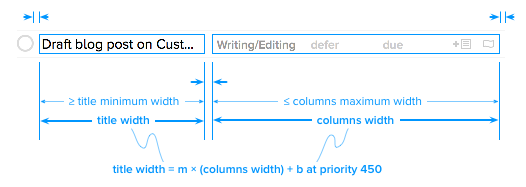
Finally, in the cozy region, the minimum width contraint on the title view becomes active. The ratio constraint is violated once again. Auto Layout steals space from the columns view to maintain the width of the title view.

Active Auto Layout constraints in the cozy region

Manual Column Layout

During a layout pass, the Auto Layout system sets the frame of the columns view, then calls the layout method on OFIMetadataColumnsView. OFIMetadataColumnsView has a delegate pointer that references its host table cell view. We use that to get the information we need to position the column subviews.

First, we ask the delegate to provide an array of views, one for each column you’ve asked us to display. We install these as the subviews of the OFIMetadataColumnsView.

Next we get the desired and minimum width for each column from the delegate. We loop through the columns from right to left. For each we check whether there is enough space to render the column subview. If so, we set the frame of the subview to the desired size. In cases where we’re indenting child actions, we may not have room to render the column subview at its desired size. As long as there is enough space for at least the minimum size, we’ll still show it.

Finally, if we run out of room before positioning all the subviews, then we hide the remaining column subviews and add a mid-elipsis, ⋯, to indicate that we’re eliding some columns.

Conclusion

This implementation is not simple, but we think the experience that we’re providing is. You decide which information you would like to see. When you need more or less space, it should be as easy as resizing the window; OmniFocus and your Mac do the work to display that information in the space given, letting you focus on your own tasks.

Designing Custom Columns Layout in OmniFocus for Mac

by William Van Hecke on December 3, 2015

By William Van Hecke and Curt Clifton

Version 2.3 of OmniFocus for Mac brings two new options for how to view your tasks and projects.

  • Custom Columns is a new layout that puts data in a familiar grid, showing only the fields you choose — fields like project, due date, or estimated duration. This gives you the flexibility to show exactly as much information as you want.
  • Title Folding is an option that reduces item titles to a single line, showing the full title when the item is selected. You can turn on folding to see more items at once and to preserve a regular vertical rhythm even when your titles are of varying lengths.

These options, which provide a scannable and information-dense layout that always shows precisely what you choose, join and complement the existing Fluid layout, which intelligently chooses which fields to display and prioritizes breathing room.

In this post we’d like to describe a bit of the design thinking behind the Custom Columns layout. We’ll follow up with a post that discusses how we added the feature to our existing code.

Before jumping into the design of Custom Columns layout, let’s revisit the key design goals of OmniFocus 2. OmniFocus 1 was a terrific app, but could sometimes feel more like a system construction kit than a system. One of the design goals for OmniFocus 2 was to make OmniFocus more approachable, which we addressed in several ways.

Simplified Perspectives

OmniFocus 1 had two view modes: Project mode showed your projects hierarchically and Context mode showed your tasks and projects in a flat list. Each of these modes had a variety of view options for what items to show and how to order them. A perspective, then, was just a way to save a set of choices for one or both view modes. This was a challenging mental model, since the view options felt very transient. The connection between a perspective and the displayed information was tenuous, and choosing a perspective could even change the options for the mode that you weren’t looking at.

For OmniFocus 2, we introduced a tabbed interface where each perspective corresponds to a single tab. A tab either shows project hierarchy or doesn’t, eliminating view modes as a separate concept. The view options for each perspective are available in a popover from within the tab. This provides a concrete connection between the options and what is displayed.

Built-in Perspectives

OmniFocus 1 came with a variety of pre-configured perspectives. But because you could configure them in all the same ways as custom perspectives, all the complexity of the OmniFocus 1 perspective system was exposed. You could edit the standard “Inbox” perspective until it had absolutely nothing to do with the Inbox at all. This opened up even more ways that people could get into confusing situations, with no escape hatch.

For OmniFocus 2, we gave our built-in perspectives a drastically simplified set of options. Each perspective offers only the options that really make sense for its intended purpose, and the options are labeled with explanatory text to set expectations properly. This approach let us introduce special perspectives like Forecast and Review, each designed for a specific use case and offering a unique handful of view options.

Standard and Pro Versions

OmniFocus 1 for Mac came in a single edition that included all the customization options.

In version 2, we offer OmniFocus as a standard edition plus a Pro upgrade. This lets us provide a cleaner, less complex, more affordable product for new users or those who don’t need advanced customization. The standard edition includes our built-in perspectives with the simplified options; these are meant to cover the majority of needs for the majority of people. If you choose to upgrade to Pro, you get (among other things) fully customizable perspectives. These provide custom sorting, filtering, grouping, and saved focus and selection, so you can build your own views to cover any specialized patterns of use beyond the standard perspectives.

Fluid Layout

OmniFocus 1 laid out everything in a rigid grid of rows and columns. This had the benefit of being predictable and scannable in two dimensions, but it also felt severely constrained on the horizontal axis, often causing text to wrap in awkward ways and putting the burden on you to manually fight the battle of column widths versus window width. It also made for a layout with lots of “holes” in it, where there didn’t happen to be a value set for a given column but we needed to reserve a place for it anyway.

When you have to manage column widths yourself, you can end up with awkward wrapping and ugly holes in your layout.

For version 2, we switched to a fluid layout that places more emphasis on titles. Long titles can span the entire width of a row, followed by a deemphasized second line of metadata much like in a standard iOS table view. OmniFocus saves space by intelligently choosing which fields to show based on which fields are relevant for each item and how much space is available. At rest, the metadata fields stay as quiet as possible. But when you put the mouse pointer over a row or start editing it, they become more apparent so you can interact with them. For containers (like projects and contexts), we use the metadata row to show a summary of the items inside and how many of them are due.

This all means that there’s much less pressure on you to figure out a good window layout — the app does that work, offering a much larger range of window geometries that result in something reasonable without any extra setup. It also uses vertical space more aggressively than horizontal space, since scrolling vertically is a cheap interaction and scrolling horizontally is awkward and best avoided.

OmniFocus 2 Fluid is more space-efficient than OmniFocus 1 if you use a narrow window.

With wide windows, the Fluid layout is less dense. The new Custom Columns layout makes more efficient use of the width, with plenty of room for any extra columns you may care to add.

Adding Custom Columns to OmniFocus 2

All that worked great for a majority of OmniFocus use cases, which was a relief. When software takes configuration control away from the user and makes the computer do it, the result can be either liberating (“Yay, I don’t have to worry about this anymore!”) or irritating (“Ugh, now instead of letting me make smart decisions, the computer is making dumb decisions on my behalf”). Happily, the feedback on OmniFocus 2 has been overwhelmingly positive; we seem to have made it smart enough to handle most people’s needs gracefully!

But just because we’d made the app more approachable and more sensible without too much setup, we still wanted to do well by our customers who want more control. We identified some common themes in what else our customers wanted to be possible in the layout.

  • More vertical compactness, so that short windows can show more items without scrolling.
  • A better use of the very wide space afforded when you take OmniFocus full-screen on a big display.
  • The ability to choose which metadata fields appear.
  • More stable positions for metadata fields between rows, to improve “scannability” when comparing different rows’ contexts, duration, or other values.

On the surface, the solution might seem to be to just bring back OmniFocus 1’s spreadsheetesque layout. But we believed we could design for these needs while holding on to OmniFocus 2’s hard-earned improvements in approachability. The result of this quest for balance is the new Custom Columns layout. Superficially, it looks a bit like OmniFocus 1, but Custom Columns have a lot more intelligence behind the scenes.

  • OmniFocus automatically chooses the width for each column. (This sounds trivial but it took quite a lot of thinking and tuning to arrive at a scheme that works.) Some columns are fixed width; date columns for instance are set to be as wide as the widest possible date given your OS X date format, always resulting in a reasonable size with no wrapping. Other columns, like Project and Context, resize proportionally with the width of your window while obeying sensible minimum and maximum widths. All this means we can omit the visual noise and the invitation to fidget that come with column headers.
  • Indentation of grouped items borrows space from the title column until the titles reach a minimum width. Beyond that, we start omitting columns from left to right so that the remaining columns stay aligned.
  • In Custom Columns layout the selected columns appear in a fixed order. This is one of the more obvious tradeoffs in the design. It would certainly be possible to allow rearranging them, but we thought that the benefits were outweighed by the cognitive burden of multiplying everything in the Custom Columns interface by another dimension of complexity.
  • The existing Text Size setting in OmniFocus preferences is even smarter with Custom Columns, employing carefully-tuned reductions in negative space and smaller status circles when you choose smaller text sizes. This allows for maximal information density without spawning another setting.
  • For the standard edition, your layout is a single app-wide choice made in OmniFocus Preferences: use our recommended Fluid layout everywhere, or use the Custom Columns of your choice everywhere. The main interface of the app doesn’t force you to choose a layout or encourage you to flip back and forth.
  • If you have the Pro upgrade, the same app-wide preference applies by default, but you gain the ability to customize the layout on a per-perspective basis. As for other perspective settings, it all happens in the the view options popover. Using an app-wide default makes layout a “set it and forget it” choice for most perspectives. On the other hand, being able to choose different metadata for different perspectives opens up tons of possibilities. For example, in Quick Entry, Curt chooses to show just the item title and due date to encourage him to capture items as quickly as possible.

Custom Columns Layout in OmniFocus for Mac is our approach to introducing more flexible layouts and preserving the friendliness of the interface. The technology behind it is sophisticated (as you’ll see in the next post) but ideally, the user should be able to ignore it and get to work. Based on feedback from people in our public test phase and since our launch, we think we’ve struck a useful balance.

In our next post, we’ll discuss how we implemented this design in our existing app.

Building Push-Triggered Sync, Part V: The Big Picture

by Tim Ekl on October 12, 2015

At this point, we’re about done discussing Omni’s push architecture! We’ve already seen Go, the APNs data structures and connection, and the pipeline processor that manages hundreds of thousands of push notifications for OmniFocus customers every day. All that’s left is to take a quick tour of some other parts of the stack that support this infrastructure.

As mentioned earlier, much of Omni Sync Server is built atop FreeBSD, and the push provider is no exception. Since Go targets FreeBSD as a “first-class citizen” for compilation and execution, and there’s a port for the Go language, it’s easy to get a Go toolchain up and running. Simply run pkg install lang/go to get all the tools needed for building Go programs.

At Omni, we keep a FreeBSD system in the rotation in our automated build system. Every few hours, it checks out the latest source for the push provider from our internal SVN server, builds it, and archives the result. Along with the actual Go sources for the provider, we provide a Makefile and package information, so that the archived product is an xzipped FreeBSD package. This way, we can take advantage of FreeBSD’s existing package management system for easy deployment and upgrades of the push provider.

Next up, we needed a way to hang on to notification information: what clients were registered with the provider, how they’re grouped, and some statistics tracking. We also needed to integrate with Omni Sync Server for a staged rollout of push: during testing, we enabled push only for some sync servers, in order to measure the kind of extra load that push would levy on our sync system. (Thankfully, this period was very brief, and push is enabled for every customer now.)

All of this information was very well suited for a relational database. However, we’re in a bit of a transitional period there as well. For older applications, like Omni Sync Server, we already have MySQL set up and running well. For newer code, we’re trying to use PostgreSQL wherever possible.

As a result, the push provider wound up talking to both databases! We store all the new push-related information – things like device and group IDs, as well as counts of notifications sent – in PostgreSQL. We also interfaced with a read-only replica of the Omni Sync Server database for checking customers’ sync servers. (While this might not seem like the optimal solution, we’ve been happily using MySQL in production for a few years, and there wasn’t any sense in potentially destabilizing everybody’s sync experience for a PostgreSQL migration. If it ain’t broke, don’t fix it!)

The Web portion of the provider was fairly straightforward. Rather than try to wrap Web access in Apache or nginx, or write a separate Web interface that called a push API, we used Go’s built-in HTTP and HTML templating support to handle all incoming HTTP requests and expose a simple but serviceable administrative interface.

Of course, security – and future compatibility – were big concerns for push. On top of plain HTTP, Go’s standard library also provided a flexible implementation for handling HTTPS through the crypto/tls package. With this, we were able to ensure that the provider passed Apple’s strict ATS requirements, and that all our connections to Apple’s push service were encrypted as well.

In building the push provider, our engineers stood on the shoulders of giants. Lots of hard work went into each of the components mentioned in this post, and thanks in large part to their efficiency and utility, we were able to start work on the provider and deploy it to our customers in less than three months. Of course, our customers were invaluable in this process as well - hundreds of helpful people volunteered for the OmniFocus beta program, and helped us see how push would work together with Omni Sync Server.

As of this writing, the push provider has already sent over ten million push notifications. We’re looking forward to the next ten!

Building Push-Triggered Sync, Part IV: The Notification Pipeline

by Tim Ekl on October 12, 2015

So far in this series, we’ve chosen the Go language to build a push provider; we designed data structures that represent notifications, according to Apple’s specifications; and we’ve connected to APNs so we can send those notifications to Apple (and thus to our customers).

Along the way, though, Omni’s push provider needs to do a fair bit of preprocessing and other work for every notification it prepares to send. There’s also the chance that we won’t actually want to send some notifications, instead preferring to filter them out. In the current provider, we consider each notification for:

  • Its bundle ID – notifications need to be sent across the right connection for their bundle ID, and if the ID doesn’t match up with one of the current versions of OmniFocus, we shouldn’t send it.
  • Logging – we want to keep some debugging information around for notifications, just to make sure they’re all being delivered properly.
  • Statistics – we keep an aggregate count of all the notifications that pass through the provider.
  • Associated Omni Sync Server information – while we roll out the push provider, we want to be able to gradually enable notifications for different sync servers, so as to measure the load that push-triggered sync levies on those servers.
  • Error responses from APNs – Apple may tell us that a notification was malformed, or our connection to APNs may drop unexpectedly.

Overall, we want an architecture that can handle all these different needs in a unified manner. Each of these considerations needs to be its own component, but should have an interface roughly similar to all the others, so that we can debug them separately and also compose them easily to form the entire provider.

Luckily, Go has a wealth of documentation – not only for each API, but also in the form of more general guides and examples. One of these discusses a concurrency pattern that can be built entirely out of Go’s language builtins: that of a pipeline. (Read the full article here.)

The general idea behind a Go pipeline revolves around a combination of two important concurrency primitives: channels and goroutines. At their simplest, a channel is a thread-safe way to pass values between two different parts of a program, and a goroutine is a very lightweight way of running a function on a different thread. (The actual implementation details – and implications – are much more complex, but this should suffice for our purposes.)

If we take both channels and goroutines for granted, we can start setting up a bunch of different pipeline components (called “stages” in the original article) that take in a value on a channel, do some arbitrary thing with it, and push it out on another channel. Let’s consider the example of a Notification instance being logged out for debugging – we’ll want to just print the notification in its entirety, then pass it down the pipeline unchanged. We might write this pipeline component as:

func LogPipe(input <-chan Notification) <-chan Notification {
    output := make(chan Notification)
    go func() {
        for notification := range input {
            fmt.Printf("Notification: %v\n", notification)
            output <- notification
        }
        close(output)
    }()
    return output
}

With this implementation, constructing an instance of this logging pipeline component is as simple as calling a function. It needs an existing channel as input, but gives back a new output channel; this means that we can easily chain multiple different components by passing the output channel from one function to the input of another.

We run the “pump” for this component as a goroutine, so that it’s always running alongside the rest of our program. Inside, we use the range of the input channel, so that the goroutine blocks until a notification comes through. When the input channel closes, this for loop over the input channel terminates. At that point, we’ll close the output channel too, signaling down the pipeline that we’re done handling notifications.

For the push provider’s use, we can do a bunch of different things in each of these components – and logging is only the simplest! The provider itself is structured as a pipeline with nearly a dozen components from start to end:

  • The logging component looks very similar to the above, with just a little bit more configurability about where to send logs (and with what severity).
  • The statistics component is also similar to the above, but instead of logging out a message, it increments a few internal counters depending on the contents of the notification.
  • The OSS component uses the UserInfo map [mentioned previously](TODO link to part 2), which we populate with the sender’s OSS username when building some Notification instances. If we need to drop a notification – perhaps because the sending user is on a sync server that’s under heavy load – we can simply refuse to pass it along the output channel from this component.

Even the persistent connection to APNs is handled with a pair of these pipeline components. The first takes in notifications, sends them over to APNs, and forwards them unconditionally; the second then buffers the sent notifications briefly to await an error, then forwards them in turn.

Keep in mind, too, that the pipeline components can have more than one input or output channel! Omni’s provider also includes a pipeline multiplexer and demultiplexer. These components are used to split up the notification stream (based on the associated bundle ID) for transmission to APNs, then rejoin the stream later after the APNs components pass the sent notifications through.

This sort of pipeline architecture is how the provider can handle Omni’s volumes of push notifications. At its peak, our single push provider instance transmits close to 500 notifications every minute – while still using only a few percent of one server’s CPU.

While Go makes this sort of concurrency quick to write and efficiently scalable, it’s not the only piece involved in the puzzle. Next time, we’ll discuss some other technologies involved in the provider stack, including the backing database used to store device registrations.

Building Push-Triggered Sync, Part III: Connecting to APNs

by Tim Ekl on September 21, 2015

Now that we’ve converted our notification data into a format that’s suitable for sending to Apple, our fledgling push provider needs a connection into APNs in order to send that data. Once again, Apple’s documentation comes to our rescue: the chapter “Provider Communication with Apple Push Notification Service” describes how to manage connections to the push notification service.

Among the important bits in this chapter:

  • When connecting, the provider needs the SSL certificate from the Member Center available for authenticating itself to Apple.
  • The provider should maintain a persistent connection to APNs, rather than connecting and disconnecting for each notification. (At higher volumes, Apple might even consider this behavior to be a DDOS attack!)
  • There are two different environments for push notifications: development and production. A connection is specific to one app’s bundle ID, and therefore (at least in Omni’s bundle ID configuration) specific to one of these environments.

To handle all this, we need to build a little flexibility into the provider. We turned to the open-source gcfg library, which can be imported into a Go project simply by running

go get "code.google.com/p/gcfg"

and then importing that same URL at the head of a Go file. With this library, we can define a configuration file that tells the provider about what APNs host(s) it should connect to, and what certificates it should use along the way.

Let’s take a look first at the Go struct that the provider reads its APNs configuration into:

type ConnConfig struct {
    Domain   string
    CertFile string
    KeyFile  string
}

This struct expresses a single connection to APNs. It defines the domain we’ll connect to, letting us switch between sandbox and production environments by changing the host we contact. It also lets us tell the provider where its certificates are, so that it can establish a secure connection and identify itself to APNs, all in one swoop.

For OmniFocus, though, we have multiple bundle IDs – one for the Universal version of the app, and one for the iPhone-only variant – so we’ll need a way to connect to APNs multiple times. To accomplish this, we parse something slightly more complex out of the configuration file:

func ParseConfigFile(filePath string) (map[string]*ConnConfig, error) {
    var configuration struct {
        Apns map[string]*ConnConfig
    }

    err := gcfg.ReadFileInto(&configuration, filePath)
    if err != nil {
        return nil, err
    }
    return configuration.Apns, nil
}

Instead of just reading a single instance of the ConnConfig struct, we’ll read an entire map of them, keyed by strings. The gcfg package uses maps to represent configuration subsections – instead of just specifying a single apns section, we can specify a bunch, each with its own key:

[apns "com.omnigroup.OmniFocus2.iPad"] ; Universal
domain = sandbox.push.apple.com
certFile = debug-universal.cer
keyFile = debug-universal.key

[apns "com.omnigroup.OmniFocus2.iPhone"] ; iPhone-only
domain = sandbox.push.apple.com
certFile = debug-iphone.cer
keyFile = debug-iphone.key

This way, parsing a configuration file can return one ConnConfig struct for each bundle ID that we’ll use to connect. The provider’s connection code can then iterate over these structs, establishing multiple connections along the way. For each connection, that code is fairly straightforward:

func (config *ConnConfig) connectAPNs() (*tls.Conn, error) {
    cert, err := tls.LoadX509KeyPair(config.CertFile, config.KeyFile)
    if err != nil {
        return nil, err
    }

    tlsConfig := new(tls.Config)
    tlsConfig.Certificates = []tls.Certificate{cert}

    host := net.JoinHostPort("gateway." + config.Domain, "2195")
    conn, err := tls.Dial("tcp", host, tlsConfig)
    if err != nil {
        return nil, err
    }

    return conn, err
}

Once this connection is established, the provider can hang on to this tls.Conn pointer as long as it needs to, sending multiple notifications – in the form of the frames described in the previous post – when changes occur in OmniFocus. In the next post, we’ll take a look at how the provider manages all the notifications it needs to send across these connections.